Hi David,
Here is a post tutorial.
You can use posts for all the different items of information you wish to include in the Jewish Museum of the American West. Posts are perfect for items you wish to heavily categorise for easy searching and structuring. For example, if you’re wanting to add information about the Newmark’s then you would include it in a post.
So, you’ll already know how to get into the ‘backend’ of your new WordPress website, and if you don’t, you can remind yourself here.
Once you are there, you’ll see ‘POSTS’ on the left hand side menu system. Here you can see and amend your posts that have already been uploaded, add / generate new posts, add further categories for your information, and add further tags for your information. Currently, tags have not been addressed so do not need attention at this point.
As we know, that backend of WordPress after loggin will look like this. 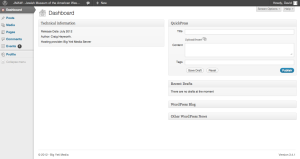 It will look like the following. This is your dashboard as discussed here. Please note, that you can click any of these images to enlarge them for easy viewing.
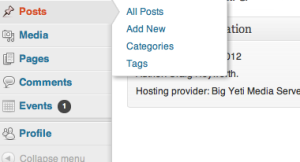
So once you’ve navigated to this screen, you’ll see the post menu and upon hover, it’ll span out like this:
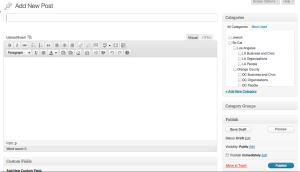
After clicking the ‘Add New’ post option, you’ll be taken to a very powerful posting system. Don’t worry if it looks slightly overwhelming at this point. WordPress does that as it is an entirely new interface, however, with a little familiarity, one will find that a lot of the functions and interface have been stolen from the likes of Microsoft Word, and other familiar softwares. So, you’ll be brought to this screen:
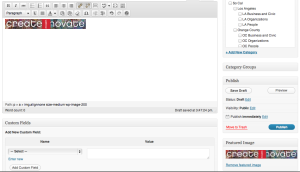
You will see at the top a large box that spans across the majority of the page. This is where you can insert the post title. Below is a sort of ‘Microsoft Word’ style word editor, and it has two tabs that you’ll see towards the top right; one saying ‘Visual’, the other saying ‘HTML’. Pretty self explanatory but one will show you a near representation of how your post will view online, the other is the html code, so if you’re familiar, you have the option of working in this language.
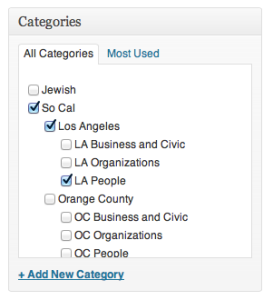
On the right, you’ll see the category system. They are easy tick boxes. I’ve set up a few categories for you which you’ll see, and you can use these to place them in certain sections of the site. For example, if you selected your post to be seen in the following categories; ‘So Cal’, ‘LA’, ‘LA People’:
It would show in this category on the live site:
Please notice that I’ve added So Cal, to have the post show in the category of Southern California should the user search under this, ‘Los Angeles’, again for categorisation under LA, and then finally ‘LA People’. So that’s just to be aware that selecting only LA People, won’t mean that it shows in the LA section, or Southern California section independently. You can have a play around with this and see what I mean.
Below the categories on the right, you’ll see the ‘Publish Tab’
This will does exactly what it says on the tin. You can save the post as a draft for you to come back to via the ‘All Post’ section on the left menu bar, ‘Preview’ the post, to see what it would currently look like without having to publish it, and then ‘Publish’, which will post it to the live site, neatly placed under that categories you selected above.
Below this, is the ‘Feature Image’ section. This is where you select an image to show under all the menu, and search pages.
Before you click this, make sure you place your cursor in the ‘Visual’ window so it knows where you’ll be placing your image. Like this: 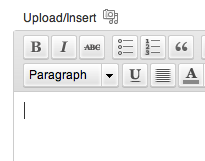
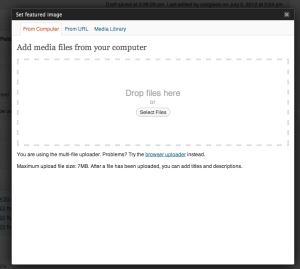
Once you click ‘Set Feature Image’, you’ll be take to the following screen:
Once here, you can upload your image from your computer via the ‘Select Files’ button in the center. Follow the instructions as you would any familiar uploader. This will add your image directly to the server, ready for use. Once done, you’ll be presented with a page similar to the following.
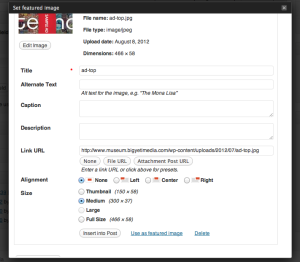
There is a lot functionality with WordPress which over time you’ll become more and more familiar with, however, the main points on this screen to note are the following:
- The ‘Title’ option. If you title the image, it will show up in a small box on the live site when the use hover’s their mouse over the image. If you remove this title, and make it blank, it will not show this box for the user, but still function.
- Alignment: for this, you can select where on the post page you wish to show the image. For this demonstration, use ‘left’.
- ‘Size’ I would recommend always adding your images to site in size ‘Medium’, but the size is dependent on the original pixel size of the image you uploaded. Therefore, double check the numbers to the right of image size description to assertain how large it is. You’re looking to get close to around 300 pixels, that sort of size. This is only to prevent your page being over taken with the image.
- ‘insert into post’ and ‘use as feature image’. You want to click ‘Use as Featured Image’ first, and then click ‘Insert into Post’, which will neatly close the window for you.
